Model 210-1 - Installation and Operating Instructions
Installing Zinc Anode Plates
- The anode plate(s) should be installed on the bottom of the hull, preferably between the transom and one third of the vessel length forward of the transom. The actual location will vary from boat to boat due to individual characteristics of the underwater hull and the interior arrangement of machinery and living space. The anode location is almost always a compromise between the ideal and what is possible. The ideal is for the anodes to be in the area of the highest concentration of metals to be protected. What is possible is generally determined by the accessibility on the inside of the hull for locating the necessary thru-hull penetrations.
- Each anode plate should be mounted on two insulated studs. Follow the detailed instructions supplied with the bolts.
- No anode should be located closer that twelve inches to the reference assembly.
- If an anode plate is mounted in an exposed location, where it possibly will catch or be damaged by debris in the water, a fairing block should be installed in front of it.
- Anode plates should never be painted.
- Zinc sacrificial anodes must be made of a very high quality alloy. Only zinc anodes that meet or exceed U.S. Navy military specification A18001J should be used. Ask your factory authorized Electro-Guard dealer if you don't know where to acquire anodes that meet the above specification. Using zinc anodes of inferior quality may result in inadequate protection.
- The table below shows zinc plate sizes and number relative to the boat size. Zinc anodes indicated in the table can be 1/2" or 1" thick. One inch thick anodes will supply the same amount of protective current as one-half inch thick anodes but will last approximately twice as long.
Following the above table will provide enough zinc in ninety percent of the cases. If in doubt, put on more than called for in the table. Painting the underwater metal fittings will help reduce the electrical current drain on the anodes and, therefore, extend the life of the anodes.BOAT LENGTH SINGLE SCREW TWIN SCREW 40' TO 45' 6" X12" - 1 EA. 6" X12" - 2 EA. 46' TO 55' 6" X12" - 2 EA. 6" X12" - 3 EA. 56' TO 70' 6" X12" - 3 EA. 6" X12" - 4 EA. - REMOVE ALL ZINCS WHICH ARE AFFIXED TO OR CONNECTED TO ANY BONDED UNDERWATER FITTINGS.CAUTION: Do Not Remove zincs that are on unbonded fittings or are installed in machinery inside the boat.
Installing the Reference Assembly:
- Install as close as is practical to, but not touching, a protected fitting.
- Never paint the reference electrode.
- Keep at least twelve inches away from the nearest anode.
- Follow the detailed instructions that are attached to the reference assembly.
- The alloy of the Electro-Guard reference plate is critical. Replace only with an appropriate reference plate supplied by Electro-Guard, Inc. Do not try to substitute as this may lead to failure of the system to operate correctly.
Installing the Controller:
- This unit is designed to be flush mounted by making a cutout of sufficient dimensions.
- The controller should be mounted in a high visibility location. It should not be located behind a door, inside a cupboard, or anywhere else where it will be hidden from view.
- Typical acceptable locations for the controller are: near the helm, in the main cabin or in the engine room.
- Do not locate the controller where it may get wet or be exposed to weather.
- Do not locate the controller closer than 25" to any magnetic compass or auto pilot compass.
Connecting System Components to Controller:
- Route a green #14 AWG wire from the #1 stud on the reference assembly to the controller. Connect this wire to the terminal marked "G" on the connection barrier strip on the back of the controller.
- Route a white #14 AWG wire from the #2 stud on the reference assembly to the controller. Connect this wire to the terminal marked "W" on the controller barrier strip.
- Route a yellow #14 AWG wire from a major fitting in the bonding system (such as a strut, shaft log or rudder log) to the controller. Connect this wire to the "Y" terminal on the controller barrier strip. The yellow hookup wire should be a separate connection directly to a major fitting that is already in the general bonding system. The connection should be made at a different location than that of the general bonding system connection. This connection assures that the potential meter (colored display) will indicate the true solution potential of a major underwater fitting, which in turn represents the protection level of all the bonded fittings.
- Route a yellow #14 AWG wire with one black stripe (or tape marked with one black band) from the propeller shaft sense brushes to the terminal marked "PS" on the controller barrier strip.
- Route red #8 AWG wire from the bonding system trunk line to the controller terminal marked "R" on the barrier strip.
- Route red #8 AWG wire from the shaft slip ring contact brushes that will input current into the shaft/propeller assembly to the controller terminal marked "R" on the barrier strip.
- Route a brown #8 AWG wire from the anode(s) to the controller terminal marked "B" on the barrier strip.
- Use marine grade DC primary wire to connect the system components to the controller. The wire color code should be followed. Wire of the correct colors is available at most marine hardware stores. The most common reason for new system malfunction is incorrect connection of hookup wiring. If the color code is followed, it is impossible to connect the system wiring incorrectly. The code is as follows: Brown (B) -- zinc anodes, Red (R) -- bonding system and propeller shaft current contact(s), Yellow(Y) -- a major fitting in the bonding system, Yellow w/one black stripe or one black band (PS) -- port propeller/shaft sense brush, Yellow w/two black stripes or two black bands (S) -- starboard propeller/shaft sense brush, White(W) -- the # 2 stud of the reference cell assembly, Green(G) -- the #1 stud of the reference cell assembly.
Bonding the Boat and Connecting to the Barrier Strip:
- A heavy gauge trunk line should be installed near the centerline of the boat. It should start at the most forward thru-hull fitting and end near or on the transom. The trunk line should be a #6 AWG or larger. Branch circuits can be smaller wire gauge but in no case smaller than #12 AWG.
- Splice, solder and seal branch wires to connect all exposed underwater fittings. It is desirable to make the bonding to the major fittings redundant. For instance, a branch wire may be connected from the trunk line to a rudder log, from the log to two strut bolts, from the strut bolts to two shaft log bolts and from the shaft log back to the trunk line. All underwater fittings that are to be protected together must be electrically bonded.
- Any existing bond wires which will be used should be inspected for corrosion and/or poor connections.
- The propulsion engines should be included in the bonding system. The point of connection should be at the engine negative terminal or its buss as defined by the American Boat and Yacht Council's DC electrical wiring standards.
- A coiled flexible wire should be connected between the main bonding trunk wire and any item that moves, such as the rudders, shaft wipers and engines. Marine DC primary wire is the recommended type for this purpose.
- The propeller shaft should have a shaft contact assembly installed. Propeller shafts 1 3/4" & larger should use propeller shaft slip ring contacts to provide reliable protection. Shaft contacts should be connected directly to the terminal barrier bond connection. The connecting wire should be a minimum of AWG 8.
- Any iron, steel or aluminum underwater fittings or structures should be electrically isolated from this bonding system and protected separately. These metals are not adequately protected at the same electrical potential that the copper alloys, stainless steel and lead are protected.
- The bonding system should be connected directly by one or more AWG 12 or larger wires to the controller barrier strip.
- Allow time for the meters to stabilize after the boat is put into the water, or following final connection when an installation is made with the boat in the water.
Operation:
- Set the "BALANCE CURRENT" control so that the anode current meter indicates approximately 200 mA with the boat at its dock or mooring and the propulsion engines shut down. The automatic protection current control should keep the protection level in the green "SAFE" zone under all operating conditions.
- The Anode Current meter should read between 150 and 900 milliamps (mA). Continuous current readings near or over 900 mA indicates that the balance current should be adjusted as described in #1 above. Anode current may change considerably from time to time as the controller adjusts for varying tidal conditions, temperature, salinity and adjacent boats causing problems. Underway it will vary from readings at the dock. Any radical change in either meter from the normal as determined over a period of time should be cause for checking your system to determine the reason or have your Electro-Guard dealer check the system for you.
- On some boats prone to caustic alkali attack to the wood adjacent to thru-hull fittings (as evidenced by the buildup of a whitish powdery or crystalline chemical, sodium hydroxide, and subsequent deterioration of the wood) which is caused by over protection, it may be necessary to have your dealer reduce the automatic protection level to compensate for this unusual condition in your boat's hull. Any hydroxide buildup should be treated with white, distilled vinegar and your dealer should be contacted.
- The green "SAFE" zone on the Protection Level meter affords ample protection for brass, bronze, Monel, copper, stainless, and lead. However, base metals such as iron, steel and aluminum do not have adequate protection in this zone.
- When the boat is moved into brackish or fresh water areas, the protection level meter will indicate in the low or under zone and the anode current meter will show zero current. This is normal behavior for the system because there are insufficient ions in fresh water to conduct the electrical current necessary to operate the system.
- The Electro-Guard system does not protect engines, machinery or any other metal parts inside the boat.
Trouble Shooting:
Should the meters display readings that indicate system malfunction the following diagnosis of the readings and trouble shooting procedures should assist in determining the source of the problem.
- The Protection Level meter needle indicates in the "HIGH" or "OVER" zone and the Anode Current meter is at zero. Turning the "BALANCE CURRENT" control to the stop in an anti-clockwise direction does not correct the problem. Problem: Zinc anode(s) may be shorted directly to the bonding system or one or more anodes have been installed directly on an underwater fitting. Or there may be a problem with electrical continuity between the ac shoreline ground and the boat's bonding system. A polarizing metal structure (iron, steel or aluminum) has been connected into the bonding system.
- The Protection Level meter needle indicates at the left end of the "OVER" zone and the anode current meter is at zero -- both meters are reading at their zero points. The controller may not be connected to the reference cells or the bonding system.
- The Protection Level meter indicates in the "LOW" or "UNDER" zone and the anode current meter is indicating an abnormally low or zero current. The system's zinc anode(s) is either too small or completely gone; the anode(s) is consumed or has fallen off the insulated mounting studs. Also, a poor or broken electrical connection between the anode and the controller will have this same result, as will an anode that has been cast from a contaminated zinc alloy and has passivated. Only zinc anodes that meet the U.S. Navy military specification A180001J should be used with this system.
- The Protection Level meter indicates out of the "SAFE" zone and the anode current meter indicates somewhere between 150 and 900 milliamps. Either the meter reference wire is disconnected or the meter bond (sense) wire is disconnected or connected to a thru-hull fitting that is not in the general bonding system.
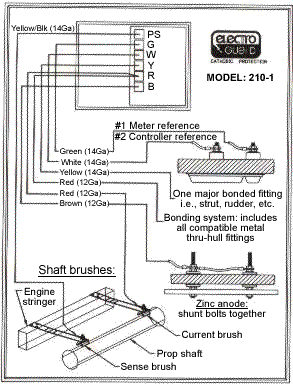
Model 210-1 schematic